Tuesday 26 January 2010

Stop Motion Animation Story Board


This story board gives a general view of my animation. It shows what happens and in what order. To make this i had to set the size of a new canvas in photo shop manually, as A2 is not available. I then went to view -> show grid, then selected snap to grid. I worked out that I needed on average every 27th frame so I inserted them into photo shop. I resized them all then placed them on the grid as best as i could. All in all I am happy with the final aesthetics of it and it is ready to print.

Monday 4 January 2010

Stop Motion Animation

Here is my finished stop motion video.

In total i have used 480 frames taken on an digital slr camera on a tripod. I feel that i have experimented a lot with this as I have tried various camera techniques such as panning and zooming in to change the perspective. This makes the animation more interesting and keeps the subjects (planes) in the main part of the golden sections. The changing landscape part of this animation is the background; it changes as the animation goes on from pictures taken throughout the day. As you can see this makes it seem as the time in the film is moving fast as it gets darker and the weather changes.

I actually captured my stop motion as it was getting dark outside, which was a problem for me as my camera was compensating for the lack of light so it ended up taking exposures of 1-2 seconds. This took a long time as well as the images each time were exposed making them brighter which made the background images brighter when I wanted them to get darker.

Over all I am happy with my stop motion, although there is a few aspects where I feel I could have done better. Some of my frames have a white border this is because the view finder on my camera is smaller than that actual image taken. I have tried to remove a lot of the frames that have included the white borders, though there were a few that I could not. When I do this again I will make the stop motion have a smoother feel, I will do this by making smaller movements which in turn gives the animation a larger frames per second.


Wednesday 2 December 2009

Proposal for picture stop motion

For my stop motion I will use different images printed out then retake photos of the images. I will take photos of paper airplanes and print them out in differnt sizes. For the background I will use photos of a landscape that have been taken through out the day. This will be the "changing landscape" aspect of my work. To start with I will have an image of myself holding one of the paper airplanes. I will cut my arm at the shoulder and elbow so that I can make it look like i am actually throwing the paper airplane in a fluid movement. I will throw to air planes then I will make them do acrobatic movements. Aswell as moving the objects I will move the camera, this includes zooming in. I aim to use 300 frames to give the short film a good length.


The video above is by Tony Gilliam and is from the film Monty Python and the Flying Circus. The aspects of stop motion are similar what I hope to achieve from my stop motion. For example, it uses photos of photos which is what i plan to use. The above video is about humour, which is not what i am trying to achieve. I that my video will have the same fluidity as the video above which I will achieve by having a fast frames per second and make each movement very small.

Stop motion test and evaluation of premiere

To practise using the camera and how the computer can automatically capture the frames and put it into premiere, we made a small stop motion clip as practise for our real one. We moved a bus and made a trail of paperclips to follow. I took about 100 photos which gave the clip a esmooth trail. The best bit about using premier is the onion skinning tool which allows you to see the last photo which allowed me to allign the next frame better.

Below is the final clip that we made.

Wednesday 18 November 2009

Joiner Photomontage

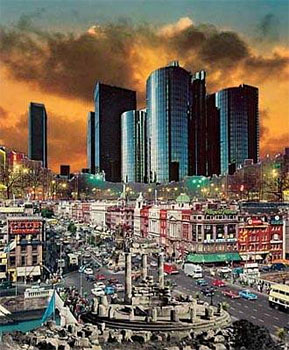
This photo montage has been done using Hockney's joiner style. I have used about 20 images taken from differnt perspectives, with some being taken closer up than others. I took the array of photos so that I could make the photo montage slightly panoramic. When joining up the images I was not too worried about how precise they were, this is because I like the effect it gives.

The panoramic effect allows more detail to be shown of the large area, as each separate photo has its own focal point which makes the image very busy. If the I took the photos in the day I think it would be too crowded and as it is dark it works well. Originally the photo would of had a white background due to photoshop, but I made it black as the white was too bright for the image and the glow of the buildings and lights was lost.

This ties in with "changing landscapes" as the centre of town is a busy place in rush hour which shows the speed cars changing. At this moment the town is busier than normal. It is also getting dark so some photos are darker than others.

I really enjoyed making this even though it was quite tricky and I want to do more in the future.


Tuesday 17 November 2009

Photomontage attempt

I am really unhappy with this as it is not what I set out to do. I found it a lot harder than I anticipated to make a Photomontage with real meaning. This is simply 4 images combined, with the background being an optical illusion taken from a book. I liked using the stamp filter and the effect it gives though I found it hard to match colours correctly. My first attempt is random. In the near future I will upload another Photomontage that i have been working on that conveys a meaning specific to me and changing landscapes.

Wednesday 4 November 2009

Photomontage Research and Plan

I like the photomontage below as it shows how the city has changed. The artist who made this used differnt images from the city. In the foreground the images are very historical and as you get further back newer buildings are used. The older images are made smaller and the larger images are larger. This gives the feeling that modern times dominate what happened in history.

I like how this image conveys a meaning and has not just been done for the sake of it. I am going to make a photomontage that means something to me, not necesarrily to anyone else. I am going to take iconic images that are important to me such as my dog. I planto have an image of my room and composit differnt surroundings onto the walls. I will then composit images of things that are important to me such as my motorbike. I think this will give the image a random feel. I will add as many images to further effect. I will use differnt perspectives and change the sizes of images. I will make sure the photomontage doesnt get stupid.

Tuesday 3 November 2009

Stop Motion Animation

Stop motion animation is the process in which many photos are taken of a scene where tiny alterations are made so that when put together they look a video. This is similar to a flip book where in each frame a small change is made. The more frames per second in your film the smoother it will run. Stop motion enables you to move inanimate objects as if they were real. This gives the video a very different feel compared to a normally filmed movie.


I like the originality of the video above as it is Lego and there are no other music videos in that format. There is no other way that specific video could of been made due to the stop motion. The bright colours and fast moving frames go well with the music.